 |
|
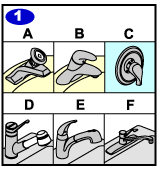
If you are replacing a cartridge in faucet type A continue to step 2a.
If you are replacing a cartridge in faucet type B continue to step 3a.
If you are replacing a cartridge in faucet type C continue to step 4a.
If you are replacing a cartridge in faucet type D continue to step 5a.
If you are replacing a cartridge in faucet type E continue to step 6a.
If you are replacing a cartridge in faucet type F continue to step 7a.
|
|
|
|
Disassembly
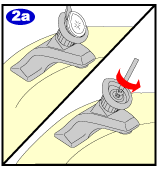
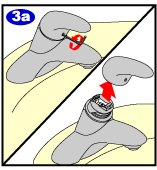
To remove the cartridge from your faucet assembly, first use a flat-headed screwdriver to carefully pry the cover from the handle. Using a Philips screwdriver unscrew the handle screw.
|
 |
|
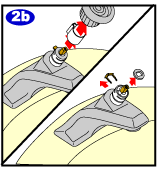
Pull the handle off from the faucet and pull the limit stop off. Remove the washer from the cartridge and use pliers to remove the retaining clip. Pull the stemp up on the old cartridge to relieve any pressure in the faucet.
|
 |
|
Cartridge Removal
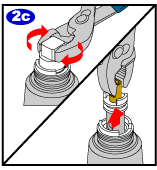
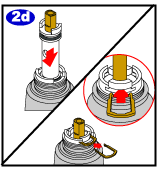
You are now ready to remove the old cartridge. Insert the white plastic tool, which is included in your kit, onto the cartridge stem so that it straddles the ears. Use pliers on the white plastic tool and loosen the cartridge by twisting 1/4 turn each direction one at a time. After removing the white plastic tool, grasp the cartridge stem and pull it straight out of the valve (using pliers or an adjustable wrench).
|
 |
|
Cartridge Reassembly
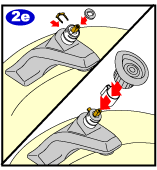
You can now install your new cartridge. Push the cartridge straight into the valve, making sure that the ears of the cartridge are lined up precisely with the retaining clip notch with the clear tabs filling the front and back center openings of the valve body, or 12:00 and 6:00.
|
 |
|
Reinstall the clip and replace the washer onto the cartridge. Then replace the stop tube, and replace and secure the handle. Finally, snap the handle cover into place. Go to step 8 if you want to reverse the Hot and Cold sides.
|
 |
|
Disassembly
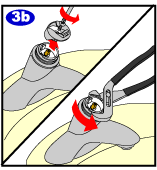
To remove the cartridge from your faucet assembly, first use a hex wrench to loosen and remove the screw from the front of the handle. Then, pull the handle off from the faucet.
|
 |
|
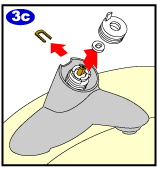
Unscrew the Philips screw and remove the adapter.
**** SPECIAL NOTE****
The pivot retainer may not be removable, depending on the version of the faucet. If you have a black plastic pivot retainer you will be able to unthread and remove it. Otherwise, you will see a gray plastic pivot retainer. If you have the gray retainer and inside of it you also see a white plastic Pivot Stop, you will be able to unthread and remove the gray pivot retainer. If you have the gray plastic pivot retainer and you DO NOT see a white plastic pivot stop inside, your gray pivot retainer is not removable.
|
 |
|
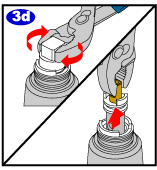
Pull up on the stem of the cartridge to relieve any pressure in the valve.
Then remove the washer and limit stop.
***This retaining clip is located in a recessed slot. It may be necessary to use a paper clip or something thin to remove this clip.
|
 |
|
Cartridge Removal
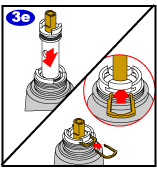
You are now ready to remove the old cartridge. Insert the white plastic tool, which is included with your new cartridge, onto the cartridge stem so that it straddles the ears. Use pliers on the white plastic tool and loosen the cartridge by twisting ¼ turn each direction one time. After removing the white plastic tool, grasp the cartridge stem and pull it straight out of the valve using pliers or an adjustable wrench.
|
 |
|
Cartridge Reassembly
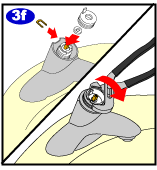
You can now install your new cartridge. Push the cartridge straight into the valve, making sure that the ears of the cartridge are lined up precisely with the clear tabs filling the front and back center openings of the valve body, or 12:00 and 6:00.
|
 |
|
To reinstall the cartridge into your faucet assembly, reverse the steps that you followed to remove the old cartridge. Replace the retaining clip and reinstall the washer and the limit stop onto the top of the cartridge. Replace the collar(s), you would have had 1 or 2 depending on the version of your faucet.
|
 |
|
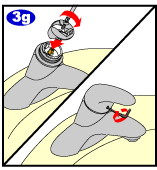
When reattaching the handle, make sure to hook the back of the adapter into the groove of the pivot retainer.
Using a Philips head screwdriver, screw the handle adapter onto the cartridge stem. Push the handle down onto the faucet housing, and re-secure with the hex key. Go to step 8 if you want to reverse the Hot and Cold sides.
|
 |
|
Disassembly
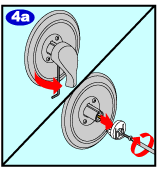
To remove the cartridge from your faucet assembly, first use a hex wrench to loosen and remove the screw from underneath the handle. Then, pull the handle out away from the wall and unscrew the handle adapter and remove it.
|
 |
|
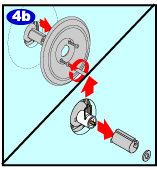
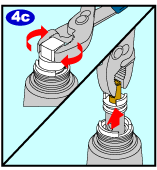
To get access to the cartridge, unscrew and remove the faucet escutcheon. Remove the washer and the limit stop from the cartridge and use pliers to remove the retaining clip.
|
 |
|
Cartridge Removal
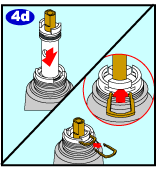
You are now ready to remove the old cartridge. Insert the white plastic tool, which is included with your new cartridge, onto the cartridge stem so that it straddles the ears. Use pliers on the white plastic tool and loosen the cartridge by twisting ¼ turn each direction one time. After removing the white plastic tool, grasp the cartridge stem and pull it straight out of the valve using pliers or an adjustable wrench.
|
 |
|
Cartridge Reassembly
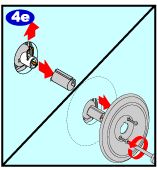
You can now install your new cartridge. Push the cartridge straight into the valve, making sure that the ears of the cartridge are lined up precisely with the clear tabs filling the front and back center openings of the valve body, or 12:00 and 6:00.
|
 |
|
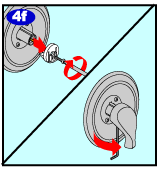
To reinstall the cartridge into your faucet assembly, reverse the steps that you followed to remove the old cartridge. Reinstall the retaining clip, the limit stop and the washer onto the cartridge. Fasten the escutcheon to the wall.
|
 |
|
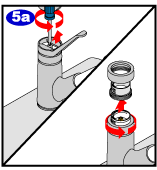
Replace the handle adapter, and finally secure the handle using the hex key. Go to step 8 if you want to reverse the Hot and Cold sides.
|
 |
|
Disassembly
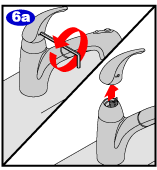
To remove the cartridge from your kitchen faucet assembly, first use a flat-headed screwdriver to carefully pry the cover from the top of the handle. Using a Philips screwdriver, unscrew the handle screw and pull the handle up off the faucet assembly. Unscrew the collar by hand and lift off. Next, lift off the pivot retainer (black in color).
|
 |
|
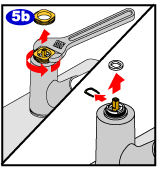
Using an adjustable wrench or a pair of adjustable pliers, twist off the retainer nut. Pull off the washer from the cartridge.
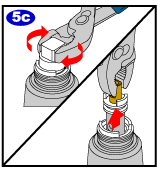
Pull the stem up on the old cartridge to relieve any pressure in the faucet then use pliers to remove the retaining clip.
|
 |
|
Cartridge Removal
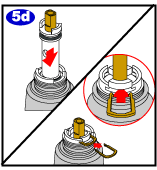
You are now ready to remove the old cartridge. Insert the white plastic tool, which is included with your new cartridge, onto the cartridge stem so that it straddles the ears. Use pliers on the white plastic tool and loosen the cartridge by twisting ¼ turn each direction one time. After removing the white plastic tool, grasp the cartridge stem and pull it straight out of the valve using pliers or an adjustable wrench.
|
 |
|
Cartridge Reassembly
You can now install your new cartridge. Push the cartridge straight into the valve, making sure that the ears of the cartridge are lined up precisely with the clear tabs filling the front and back center openings of the valve body, or 12:00 and 6:00.
|
 |
|
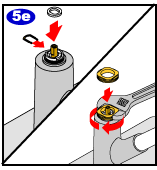
To reinstall the cartridge into your faucet assembly, reverse the steps that you followed to remove the old cartridge. Reinstall the washer onto the cartridge stem and reattach the retainer nut.
|
 |
|
Place the black plastic pivot retainer with 2 grooves facing the back of the faucet on. Tighten the collar on to the faucet assembly. Lastly, reattach the handle and click the handle cover into place. Go to step 8 if you want to reverse the Hot and Cold sides.
|
 |
|
Disassembly
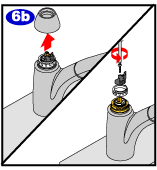
To remove the cartridge from your faucet assembly, first use a hex wrench to loosen and remove the screw from the base of the handle. Then, pull the handle up off the faucet assembly.
|
 |
|
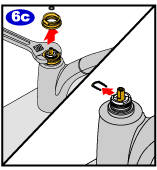
Lift off the decorative dome, unscrew the black plastic pivot retainer, and remove it. Remove the connector screw and lift off the adaptor and connector assembly. Next, remove the white handle stop.
|
 |
|
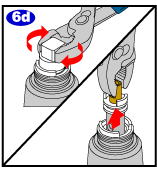
Unscrew the retainer nut using a crescent wrench. Pull off the washer from the cartridge and use pliers to remove the retaining clip.
|
 |
|
Cartridge Removal
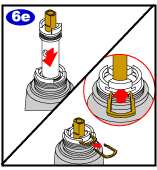
You are now ready to remove the old cartridge. Insert the white plastic tool, which is included with your new cartridge, onto the cartridge stem so that it straddles the ears. Use pliers on the white plastic tool and loosen the cartridge by twisting ¼ turn each direction one time. After removing the white plastic tool, grasp the cartridge stem and pull it straight out of the valve using pliers or an adjustable wrench.
|
 |
|
Cartridge Reassembly
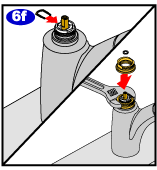
You can now install your new cartridge. Push the cartridge straight into the valve, making sure that the ears of the cartridge are lined up precisely with the clear tabs filling the front and back center openings of the valve body, or 12:00 and 6:00.
|
 |
|
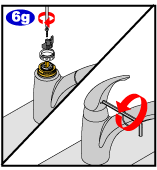
To reinstall the cartridge into your faucet assembly, reverse the steps that you followed to remove the old cartridge. Reinstall the washer onto the cartridge stem and reattach the retainer nut with adjustable pliers.
|
 |
|
Reinsert your white pivot stop, secure the handle adapter to the cartridge stem, screw on your black plastic pivot retainer and replace the decorative dome. Lastly, reattach the handle. Go to step 8 if you want to reverse the Hot and Cold sides.
|
 |
|
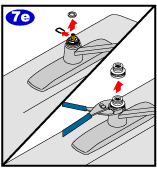
Disassembly
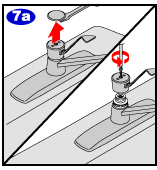
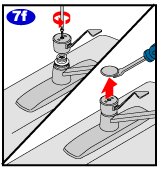
To remove the cartridge from your faucet assembly, first use a flat-headed screwdriver to carefully pry the cover from the handle. Using a Philips screwdriver, unscrew the handle screw and pull the handle up off from the faucet.
|
 |
|
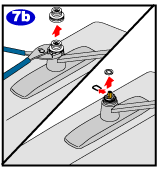
Using pliers, loosen and remove the pivot retainer nut as well. Remove the washer from the cartridge. Pull the stem up on the old cartridge to relieve any pressure in the faucet then use pliers to remove the retaining clip.
|
 |
|
Cartridge Removal
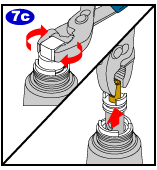
You are now ready to remove the old cartridge. Insert the white plastic tool, which is included with your new cartridge, onto the cartridge stem so that it straddles the ears. Use pliers on the white plastic tool and loosen the cartridge by twisting ¼ turn each direction one time. After removing the white plastic tool, grasp the cartridge stem and pull it straight out of the valve using pliers or an adjustable wrench.
|
 |
|
Cartridge Reassembly
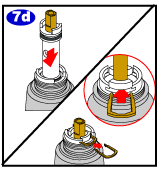
You can now install your new cartridge. Push the cartridge straight into the valve, making sure that the ears of the cartridge are lined up precisely with the clear tabs filling the front and back center openings of the valve body, or 12:00 and 6:00.
|
 |
|
To reinstall the cartridge into your faucet assembly, reverse the steps that you followed to remove the old cartridge. Replace the washer onto the cartridge stem. Using pliers, secure the pivot retainer nut to the faucet assembly.
|
 |
|
To reattach the handle, align the flat edge of the metal lever under the ridge on the retainer nut, towards the back of the nut. Then bring the handle down in the front so it drops into place. Secure the handle with the screw and snap the handle cover into place. Go to step 8 if you want to reverse the Hot and Cold sides.
|
 |
|
Reversing Hot & Cold
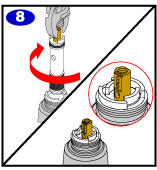
If you need to reverse the sides for Hot and Cold water first remove the handle. Next, rotate stem exactly 180 degrees and replace the handle.
|


